
WP Setup
You are free to decide which host you want to use for your website.
Read on hosting & server requirements
Multisite Setup
Greyd.Suite works on single sites or multisite installations. When it comes to use cases with several websites, working with multisites in combination with Greyd.Suite can make a lot of sense. Here are some of the use cases many of our customers choose multisite for:
- Agency staging environment
- Clients with several websites
- Franchises and other large-scale website systems
Tip: We had a very insightful Greyd Conversation episode with multisite expert Robert Windisch with a lot of useful information on how to leverage multisite for your web projects:
Step-by-step instruction
Hi, I’m Tunahan from Greyd, and today I’ll show you how to set up your multisite in WordPress. First, you need your file server. I’m using FileZilla, but you can use any FTP program you’d like, and you have to fetch your “wp-config.php” file from here. Now, open this file up in your favorite text editor and at the lower end of this file, you will find the comment: “That’s all, stop editing. Happy publishing.” Next to that, you will have to define:
define('WP_ALLOW_MULTISITE', true);
It’s also good practice to leave a comment for the section with /* multisite */ and close it with */. And now we’re ready to go. Save it.
Next, we’ll have to upload it into our file server again. Overwrite it. All right. Now we can go back and refresh the site for us to see the network setup option under “Tools”. Now note that you have to deactivate your plugins for this to work. So, we’ll go and deactivate our plugins.
All right. Now we go back to network setup. Here is the network creation site, and you can change these as you like. We will install just for now. Now you’ll have to change the contents of two files. The first one is the wp-config.php file, as we have before, and the second is the .htaccess file. We will get these from the file server as well. We have this one already, and we will get this one. Now I will open that one as well. Let’s start with this bottom one. Copy the rules. And you can just delete the content here until only “Begin WordPress” and “End WordPress” is left. And now just paste the copied rules here. We’ll do the same for the wp-config.php file. We’ll copy the definitions and paste them right next to “allow multisite”.
All right. Now, we’ll have to go to our file server again. First, before uploading them, it’s good practice to just make a backup of your files. So, if anything went wrong, you can just go back to them.
All right, now we’re good to go. Let’s upload our files. All right. Now, if we just refresh our site, you are prompted to log in again.
And we’re good to go. As you can see now, we have a multisite set up. We can just add sites by going here and clicking “Add site”. Now, let’s just pick an example: Site One. And add it. Now you have your site.
Now the only thing left to do is to just activate your plugins network-wise, like so. And you’re good to go.
For more videos and information, please visit our Helpcenter.
First of all, activate the “Allow Multisite” function by entering this line of code:

before the text /* That’s all, stop editing! Happy publishing. */ in the wp-config.php of the WordPress installation.

It is important that you deactivate all plugins. This is usually not a problem with new WordPress installations. If you are using Greyd.Suite and have already installed it, you must also deactivate the Suite on this installation. It gets a little more complicated if you want to convert an existing WordPress installation into a multisite. In this case, you will probably also need to deactivate the theme, as certain plugins may be automatically linked to the theme, as is the case with Greyd.Suite.
The sub-item “Network setup” now appears under the menu item “Tools” in the WordPress installation. Here you can select whether the installation should be set up on subfolders (greyd.de/site) or subdomains (site.greyd.de).
You will also be asked for the name of the network installation and the network administrator. Once this information has been entered, all you have to do is click on “Install” and you will then receive two code blocks:
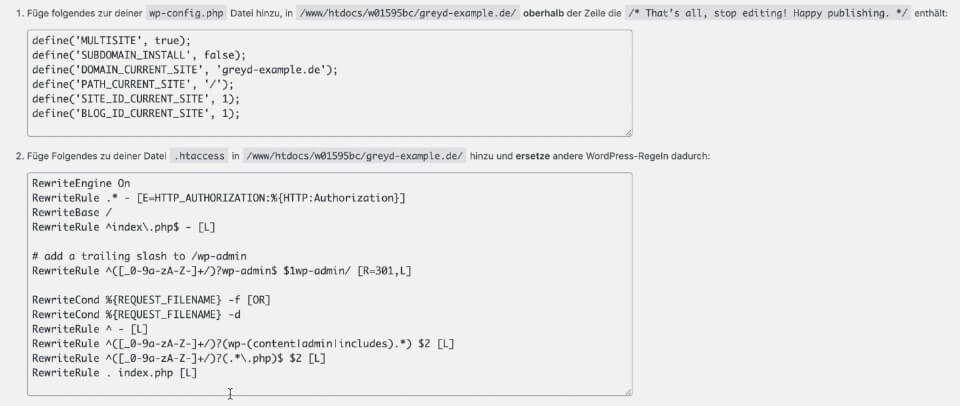
The first one must be inserted into wp-config.php, again before the line /* That’s all, stop editing! Happy blogging. */ The other code block must be added to the .htaccess file, from which all other WordPress rewrite rules must be removed beforehand.
If the two code blocks are inserted accordingly, you will be prompted to log in again when you refresh the WordPress dashboard. When you log in again, you will land on the network installation of the multisite.
Tip: In most cases, we recommend subfolders instead of subdomains. On the one hand, this gives you more flexibility, and on the other hand, with subfolders you can create new sites directly in Greyd.Hub without having to register a new subdomain in your hosting every time.
Installing Greyd.Suite
Installing Greyd.Suite is super easy. Basically you only need to activate the Greyd Plugin and the Installer will do the rest for you.
You can always find the latest version of the Greyd plugin here: https://greyd.io/customer-download/
Documentation Resources
- Greyd.Suite Installer: Installing and enabling Greyd.Suite
- Greyd.Suite Dashboard: Your central overview and access to all features, system info and more
- Greyd.Suite Features: Enable and disable the features of Greyd.Suite you need or don’t need
- Greyd.Suite License: Activate your Greyd.Suite license to access premium features or remove the Greyd banner from the frontend
The following video summarizes the process of installing and activating Greyd.Suite including an overview of where to find what in the backend and how to activate your Greyd.Suite license:
-
Hi, this is Sandra from GREYD and I’d like to show you in this video how to install GREYD.SUITE and how to get around in our backend.
To start with, we will need the GREYD plugin, which you can get from our website and then upload it in the WordPress backend under plugins. As soon as you activate the plugin, the installation process will automatically start and guide you through all the steps.
At first, it’s about the tools you want to use. GREYD.SUITE consists of several tools. There’s the GREYD Blocks plugin, which is necessary since it brings all the enhancements and additions we’ve made to the native block editor of WordPress. Then there’s the GREYD Theme, which is a full site editing theme with a lot of additional global styles, ready-to-use patterns and templates. You don’t have to use our theme — you can also work with any other block theme from WordPress. And then there’s the GREYD.Forms plugin, which is our form generator and is also optional.
Next, you can select in more detail which features of GREYD.SUITE you want to use. You can start with the default setup that comes with everything normally necessary to create and manage websites. You can activate all our features, or you can start with the absolute minimum — just the Blocks plugin and the GREYD.Hub management platform. No matter what you decide here, you will be able to activate and disable any feature later in the backend.
I’ll go for the default setup, and that’s already it. You can now leave your website setup. You can go to our Helpcenter where you will find tutorial videos and how-to articles on all our features. You can edit your site, create a child theme, etc. You can also access the license page where you can enter your GREYD.SUITE license key. You don’t have to do that right now since you can build your website and use almost all features without a license. As soon as you want to publish your website without our watermark, or if you want to use one of our advanced features, just enter your license key and activate it for this domain.
On the license page you can also see when the license was created, how long it is valid, on which websites it’s currently used, and how many websites are still available within your license. You can also access this page later via the GREYD.SUITE dashboard or from the menu. For security reasons, you will need to enter your license key again since it will be grayed out.
Now let’s have a look at the GREYD.SUITE dashboard. Here you will find all you need to know and all the links you need to work with GREYD.SUITE. At the top you’ll see an overview of all active features and can directly go to GREYD.Hub to edit your dynamic templates, post types, pop-ups, or forms. You can also access global styles, the template editor, and more.
Further down you will find an overview of big GREYD.SUITE features that you are not yet using. You can go to the website to learn more about each feature or activate it. Further down there’s another feature page link where you can enable or disable features in more detail. This includes not only GREYD.SUITE features but also smaller settings like SMTP, the form generator, or SEO settings. You will also find a link here to manage your license and some general settings, such as page speed or activating comments.
There’s also a download link where you can always access the latest version of the GREYD plugin. This is useful if you want to use it on a different website without having to download it each time from our website. You’ll also find links to our Helpcenter and FAQ section.
In the Helpcenter you’ll find tutorial videos and useful how-to articles for all our features. You can also generate a system status report, which includes information about versions and setup details. This information is extremely helpful when contacting our support — please send it along with your ticket. You’ll also find the changelog here.
Other than that, since GREYD.SUITE is integrated natively in WordPress, the rest of the backend looks more or less the same as you know it. You have your posts, media, pages, templates, forms, and custom post types. Under Appearance, you can access the site editor where you can edit your global styles, templates, and patterns.
For more videos and information, please visit our Helpcenter.