The Mathematical field block in Greyd Forms allows you to perform advanced calculations within your forms. It supports both static values and dynamic input from other fields, making it ideal for use cases such as cost estimations, score calculations, or conversions. After inserting the block into the editor, you can immediately build your desired formula using form fields and mathematical operators.
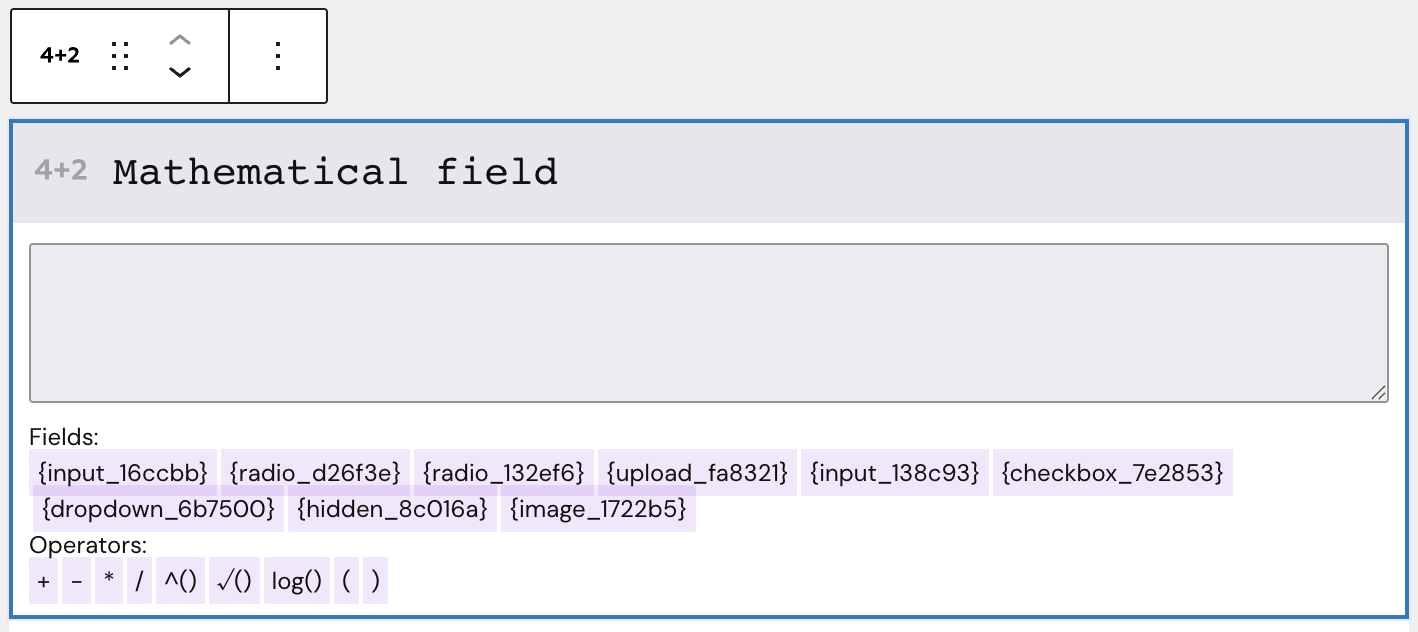
You can directly write and modify the formula in the block editor. Below the input field, you can find all available fields that can be used in the form, if they hold numerical values.
The supported operators include addition (+), subtraction (-), multiplication (*), division (/), exponentiation (^()), square root (√()), logarithm (log()), and parentheses for grouping (( and )).
Settings

In the General section, you change the automatically prepopulated field name that will be submitted with the form. There’s also a toggle to show the result and show the formula in the frontend. An additional toggle labeled Change field value depending on condition is available, which lets you customize mathematical fields on conditions. See the next section for more details.
The Rounding and decimal places section allows you to control the precision and formatting of the result. You can set the number of decimal places (default is 0), choose the rounding behavior (automatically, round up, or round off), and choose from a selection of different decimal and thousand separators.
Under Pre- & Suffix, you can configure text elements that appear before or after the calculated value. This is useful for adding a currency symbol, unit of measurement, or other explanatory labels. These settings only affect the display, not the submitted field value.
Refer to the separate Animation documentation for details about adding animations to the field.
The block also supports Animations. In the Advanced section, you can find settings for additional CSS classes and toggles to hide the block per breakpoint.
Change field value depending on condition

If the option is activated, a new section below the mathematical field is added in the editor. In this, you see three similar sections, allowing you to define conditions based on the available user input fields.
In the If section, you define the value that is going to be checked. In the condition dropdown, you pick one of these options:
- Greater (
>) - Greater than or equal to (
>=) - Smaller (
<) - Smaller than or equal to (
<=) - Equals (
=)
In the Than section, you add the value the condition is checked on. In the Then section, you can define a different formula that is used when this condition is met.
Video
Hi, this is Sandra from GREYD and today I’d like to show you how to use GREYD.Forms to create an interactive form with mathematical calculations. From a solar power system planner to an interest calculator nearly anything is possible. That way you can not only create a unique user experience, but also get very valuable website leads. Here for example I’ve got an annuity calculator where the user can select a duration and an interest rate and gets automatically displayed the costs per month and per year and can submit a web lead. So while we have a very appealing form in the frontend, in the background even the most complex calculations can take place.
What do we need for that in the backend? You can work with the block Mathematical Field whenever you want to work with numbers and/or calculations. You can either directly enter a number or you will find here lots of different operators. And you can also include your form fields dynamically to create a calculation. For example I could say I want my field “property” multiplied by the price per square meter. So as you can see, you can either directly type in here or use these field placeholders and/or operators.
Here on the right you can then enter the name of your field, which is definitely important when you want to use that field later in another mathematical calculation. Or also if you want send it with the form entry for example to your CRM. So instead of this automatic name you can use a custom name which will then also be visible as a dynamic placeholder. With these two checked boxes here you can define whether or not you want to show the result and/or the formula itself in the frontend. Depending on what kind of calculation you’re doing here, it might be interesting or important in the frontend, but often it’s also just relevant in the backend and doesn’t have to appear in the frontend. So that’s why I can decide here.
If you activate this checkbox here, you can change your field value depending on certain conditions. We’ll have a look at that later. And here you can define how many decimal places your number or the result should have and if you want to round off or up. “Automatically” means that from 0.5 it will round up and before that it will round off. As just explained, if you want to show the result, you can simply use this checkbox. But you won’t find many styling options then. It looks different if you work for example with a heading or a text field and then implement your numbers dynamically. This works exactly like Dynamic Tags, just that here you only have your dynamic form values here.
So much on this. So now let’s get back to the conditions. If you’ve activated this checkbox here, you can add one or even more conditions here. For example I could say depending on how big the property selected is, the price should not be 200€, but maybe only 150€ per square meter. So I can define a condition that if the property in that case is bigger than let’s say 500 square meters, then I want the calculation be the same but with price per square meter of only 150.
One tip: Even if your reference field is not a number like we have it here in our example, but let’s say a checkbox since you may want to add broker costs if the checkbox is activated, you can also dynamically adapt your calculation with a little workaround. This is where conditional containers and hidden fields come to place. I will now create a conditional container and make it dependent on my broker checkbox and say it has the value “on”. And then add a hidden field and give it the value “1500”. Then I copy the whole thing and define the condition for checkbox is “off”. Then the value should be “0”. And now I can use that here in my calculation. I have to update one time. So now it should be here. Now I can add my broker box in the calculation. So when the checkbox is now activated, 1500 will be added to my calculation and if it’s not activated 0 will be added to my calculation.
So much on a mathematical field. In forms with calculations it’s often a use case to have slider controls like this one here in your form. We also have a dedicated block for that, which I’ve already included here in my form. Different to other form blocks you have two labels here: one before and one after the value that’s automatically inserted. Like you can see here. That’s very handy especially if you want to work with units for example.
Other than that you can work with the regular toolbar options. You can give your field an individual name, which again is very helpful if you want to include that value later in mathematical calculations. You can define whether the field should be required or not. And then you can define the range of your slider control. By default that’s 0 to 50, but you can work with any values you’d like to have. For example here 1 to 1,000 in steps of 10. You can also define where the controller should start when the page is loaded. You will then find some styling options for the label, font size and color, if applicable also with a hover effect.
You can then define the size of the slider control itself – in height and length – and also of the controller itself. You can make it bigger or smaller. And then you have this little box here where it automatically shows the value that’s currently selected. Here again you can change the size easily and as you’ve seen you can also always work with different sizes per breakpoint. After that you can change the border radius of the track, the controller and the box to make it more round or angular. And then you will find lots of color options for the track itself, for the active or selected part of the track and both changeable for the moment when the slider control is used and also for the box here you can change background.
Last but not least you can add a help text if you want for the user, which will be visible behind such an info icon here. So much on the design and layout of slider controls and mathematical fields. Now depending on what you want to do with that form on your website, it might be good to have a form that’s an actual form that can be submitted and creates an entry. Or it might be better to just use it for display reasons. For the ladder, you’ll find this option here below the form. You can make it a non-submittable form without a submit button, which of course also changes all these follow-up actions and emails which are then not necessary anymore.
For more videos and information please visit our Helpcenter.