The Greyd Hub provides a centralized interface to manage all websites and content in your installation — whether single site or multisite. Together with the separate Site Connector feature, you can also manage installations that are located on another server. It gives you access to powerful tools for creating backups, migrating websites, and editing data.
The Greyd Hub is activated by default on every installation. It is available in the menu under Greyd.Suite → Greyd.Hub. On multisite installations, the link appears on every site, but redirects to the Network Admin. Access is restricted to users with the Super Admin role (multisite) or Administrator role (single site). On a multisite installation, the Greyd Hub can be deactivated in the Network Admin under Greyd.Suite → Features if needed.
The Greyd Hub interface consists of up to five tabs, depending on your license, with the first three being always available:
- Websites: Manage all connected sites in your installation
- Backups: Access and manage backups created by the Hub
- Database: View, modify or export database tables
If you have a subscription of the Scale package, two more tabs are available in the Greyd Hub:
- Connections: Connect external Greyd installations
- Staging: Set up and manage staging pairs
Websites Tab
The Websites tab in the Greyd Hub is the central interface for managing all websites in your WordPress installation. On a single site, only one tile is shown. In a multisite setup, all registered sites are listed either as tiles or in a table — depending on your view setting. Connected sites are shown in a separate section below the current installation.

On a multisite, there are three buttons at the top right next to the title to directly access features:
- Create new website – Opens a modal form for site creation
- Staging Assistant – Opens a modal to create a staging pair
- Migration Assistant – Opens a modal for migrating a site to another
Below the tabs, there’s a management bar which (if available) offers anchor links to other connected installations on the left, and quickly changing the view of the tiles on the right:
- Choose between a grid and a list layout
- Toggle the site preview on the tiles (deactivated by default)
- Quick links to toggle all tabs on the tiles (Actions, Information, More)
- A search bar that can be toggled, if more than one site is available (either multisite or connected sites)
Sub-navigation
The sub-navigation sits directly below the main tabs in the Websites section of the Greyd Hub. It lets you control the view layout, synchronize subtab displays, and navigate more efficiently — especially when managing large or connected networks.
You can:
- If the Site Connector feature is enabled, anchor links to connected remote sites appear on the left side for quick access.
- Toggle between Grid and List View to display websites as tiles or a compact list.
- Enable or disable previews of each website. When activated, a live iframe of the site is shown in each tile.
⚠️ In large networks, enabling previews may affect performance as all sites are rendered simultaneously. - Synchronize subtabs across all websites by selecting one of the following modes: Actions, Information, More
- Search for websites by entering a keyword that matches the domain or title. The results are filtered in real time.
Create a new website
Opens a modal with a standard form for adding a new site directly in the Greyd Hub interface. This form mirrors the WordPress “Add Site” screen but is fully integrated for seamless UX.
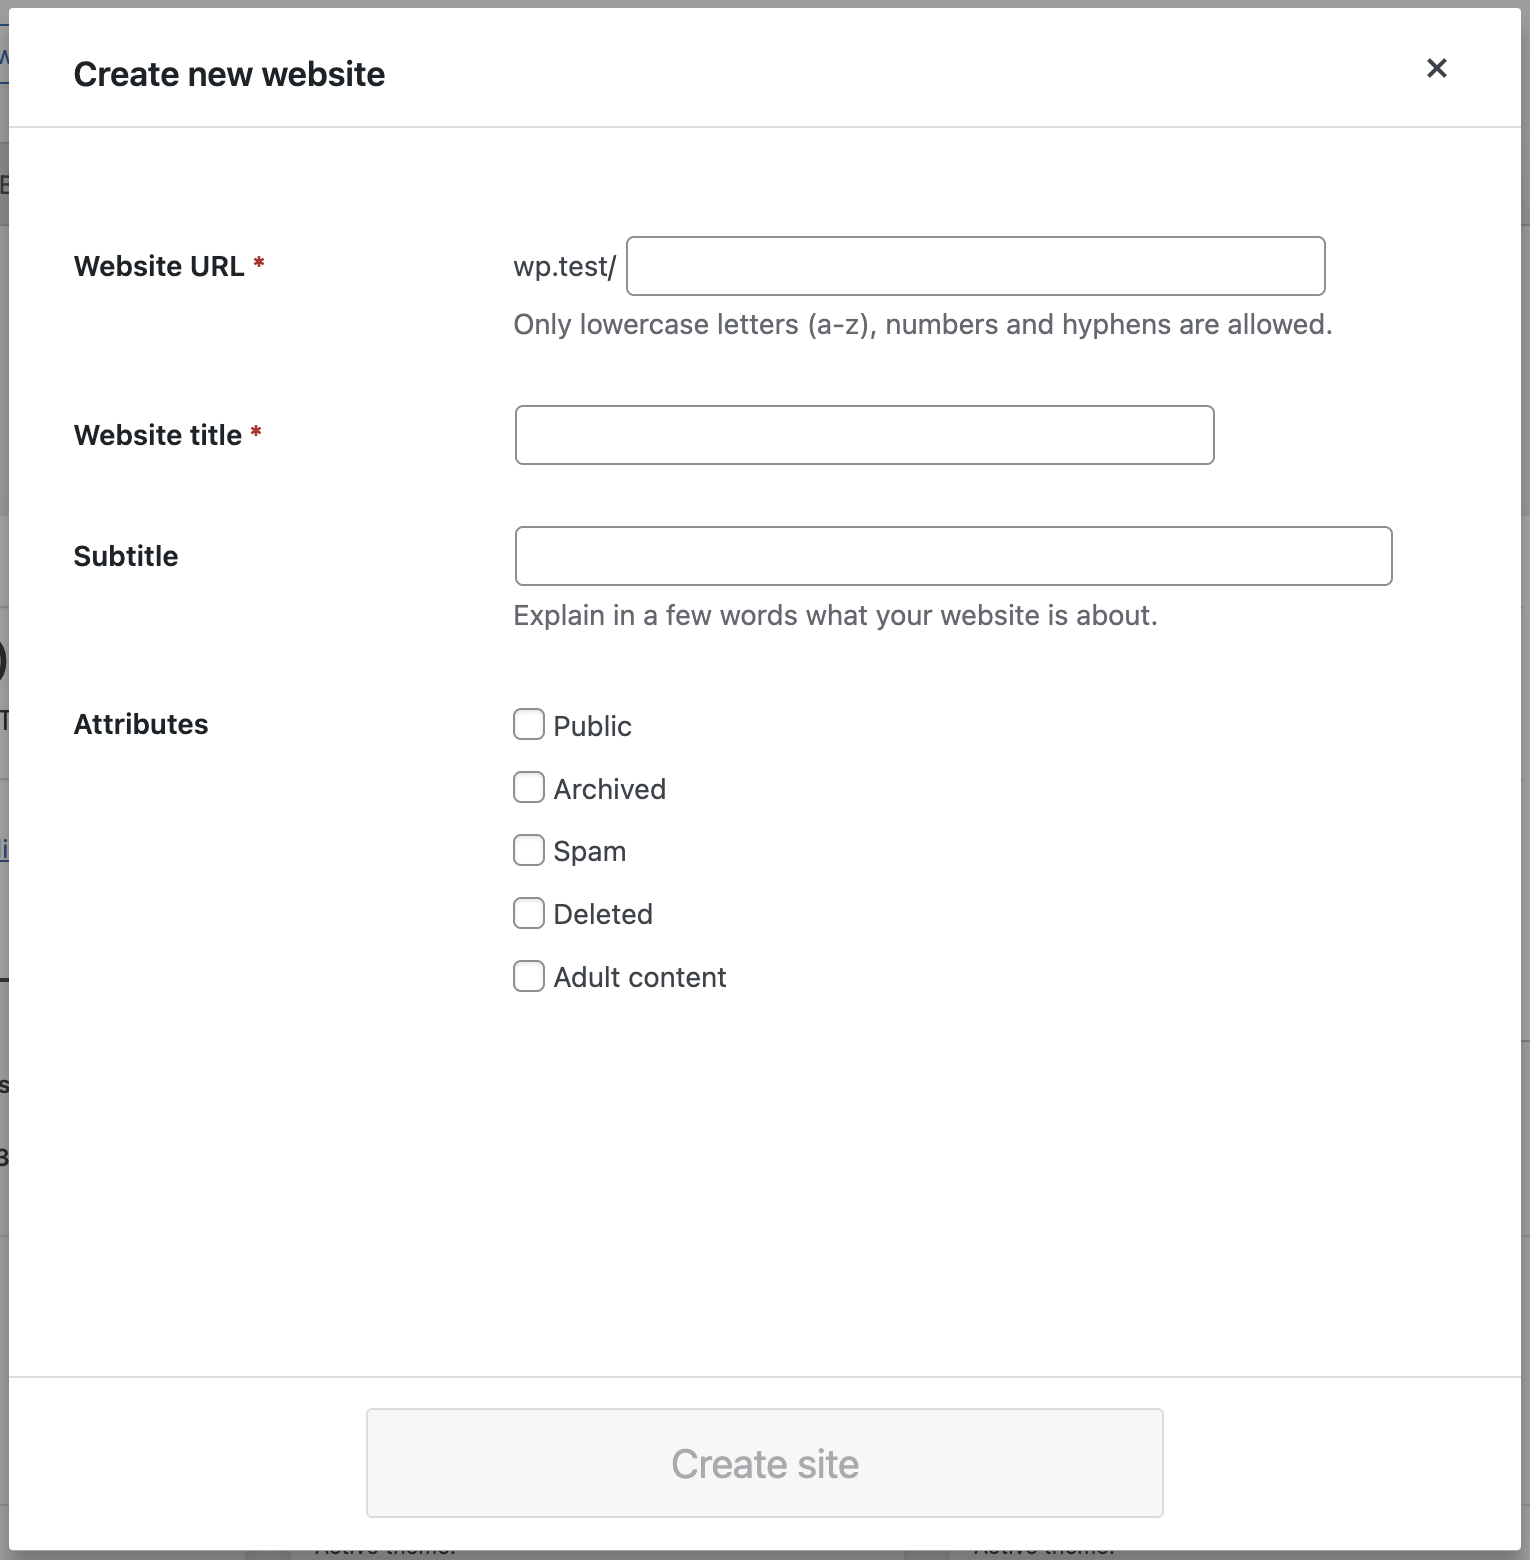
The form inside the modal mirrors the core “Add Site” function in WordPress but integrates it seamlessly into the Greyd Hub UI. You need to fill out the following fields:
Website URL: Enter the new subdomain or subdirectory (depending on your multisite setup). Only lowercase letters (a–z), numbers, and hyphens are allowed. No spaces or special characters.
Website title: This is the public name of the site, shown in the browser and WordPress dashboard.
Subtitle (optional): This is the same as the tagline in the default WordPress settings under General.
Attributes (optional): You can set the new site to public. It references the default attributes for multisites provided by the WordPress Core.
Once all fields are filled, click the Create site button to generate the new website. The process runs instantly in the background, and the new website will appear immediately in the Hub grid or list view.
Staging Assistant
The Staging Assistant allows you to create a staging environment by pairing two websites within the same network. It is available via a button in the Websites tab of the Greyd Hub and opens a modal to configure the staging relationship. This feature is only available in the Scale subscription.
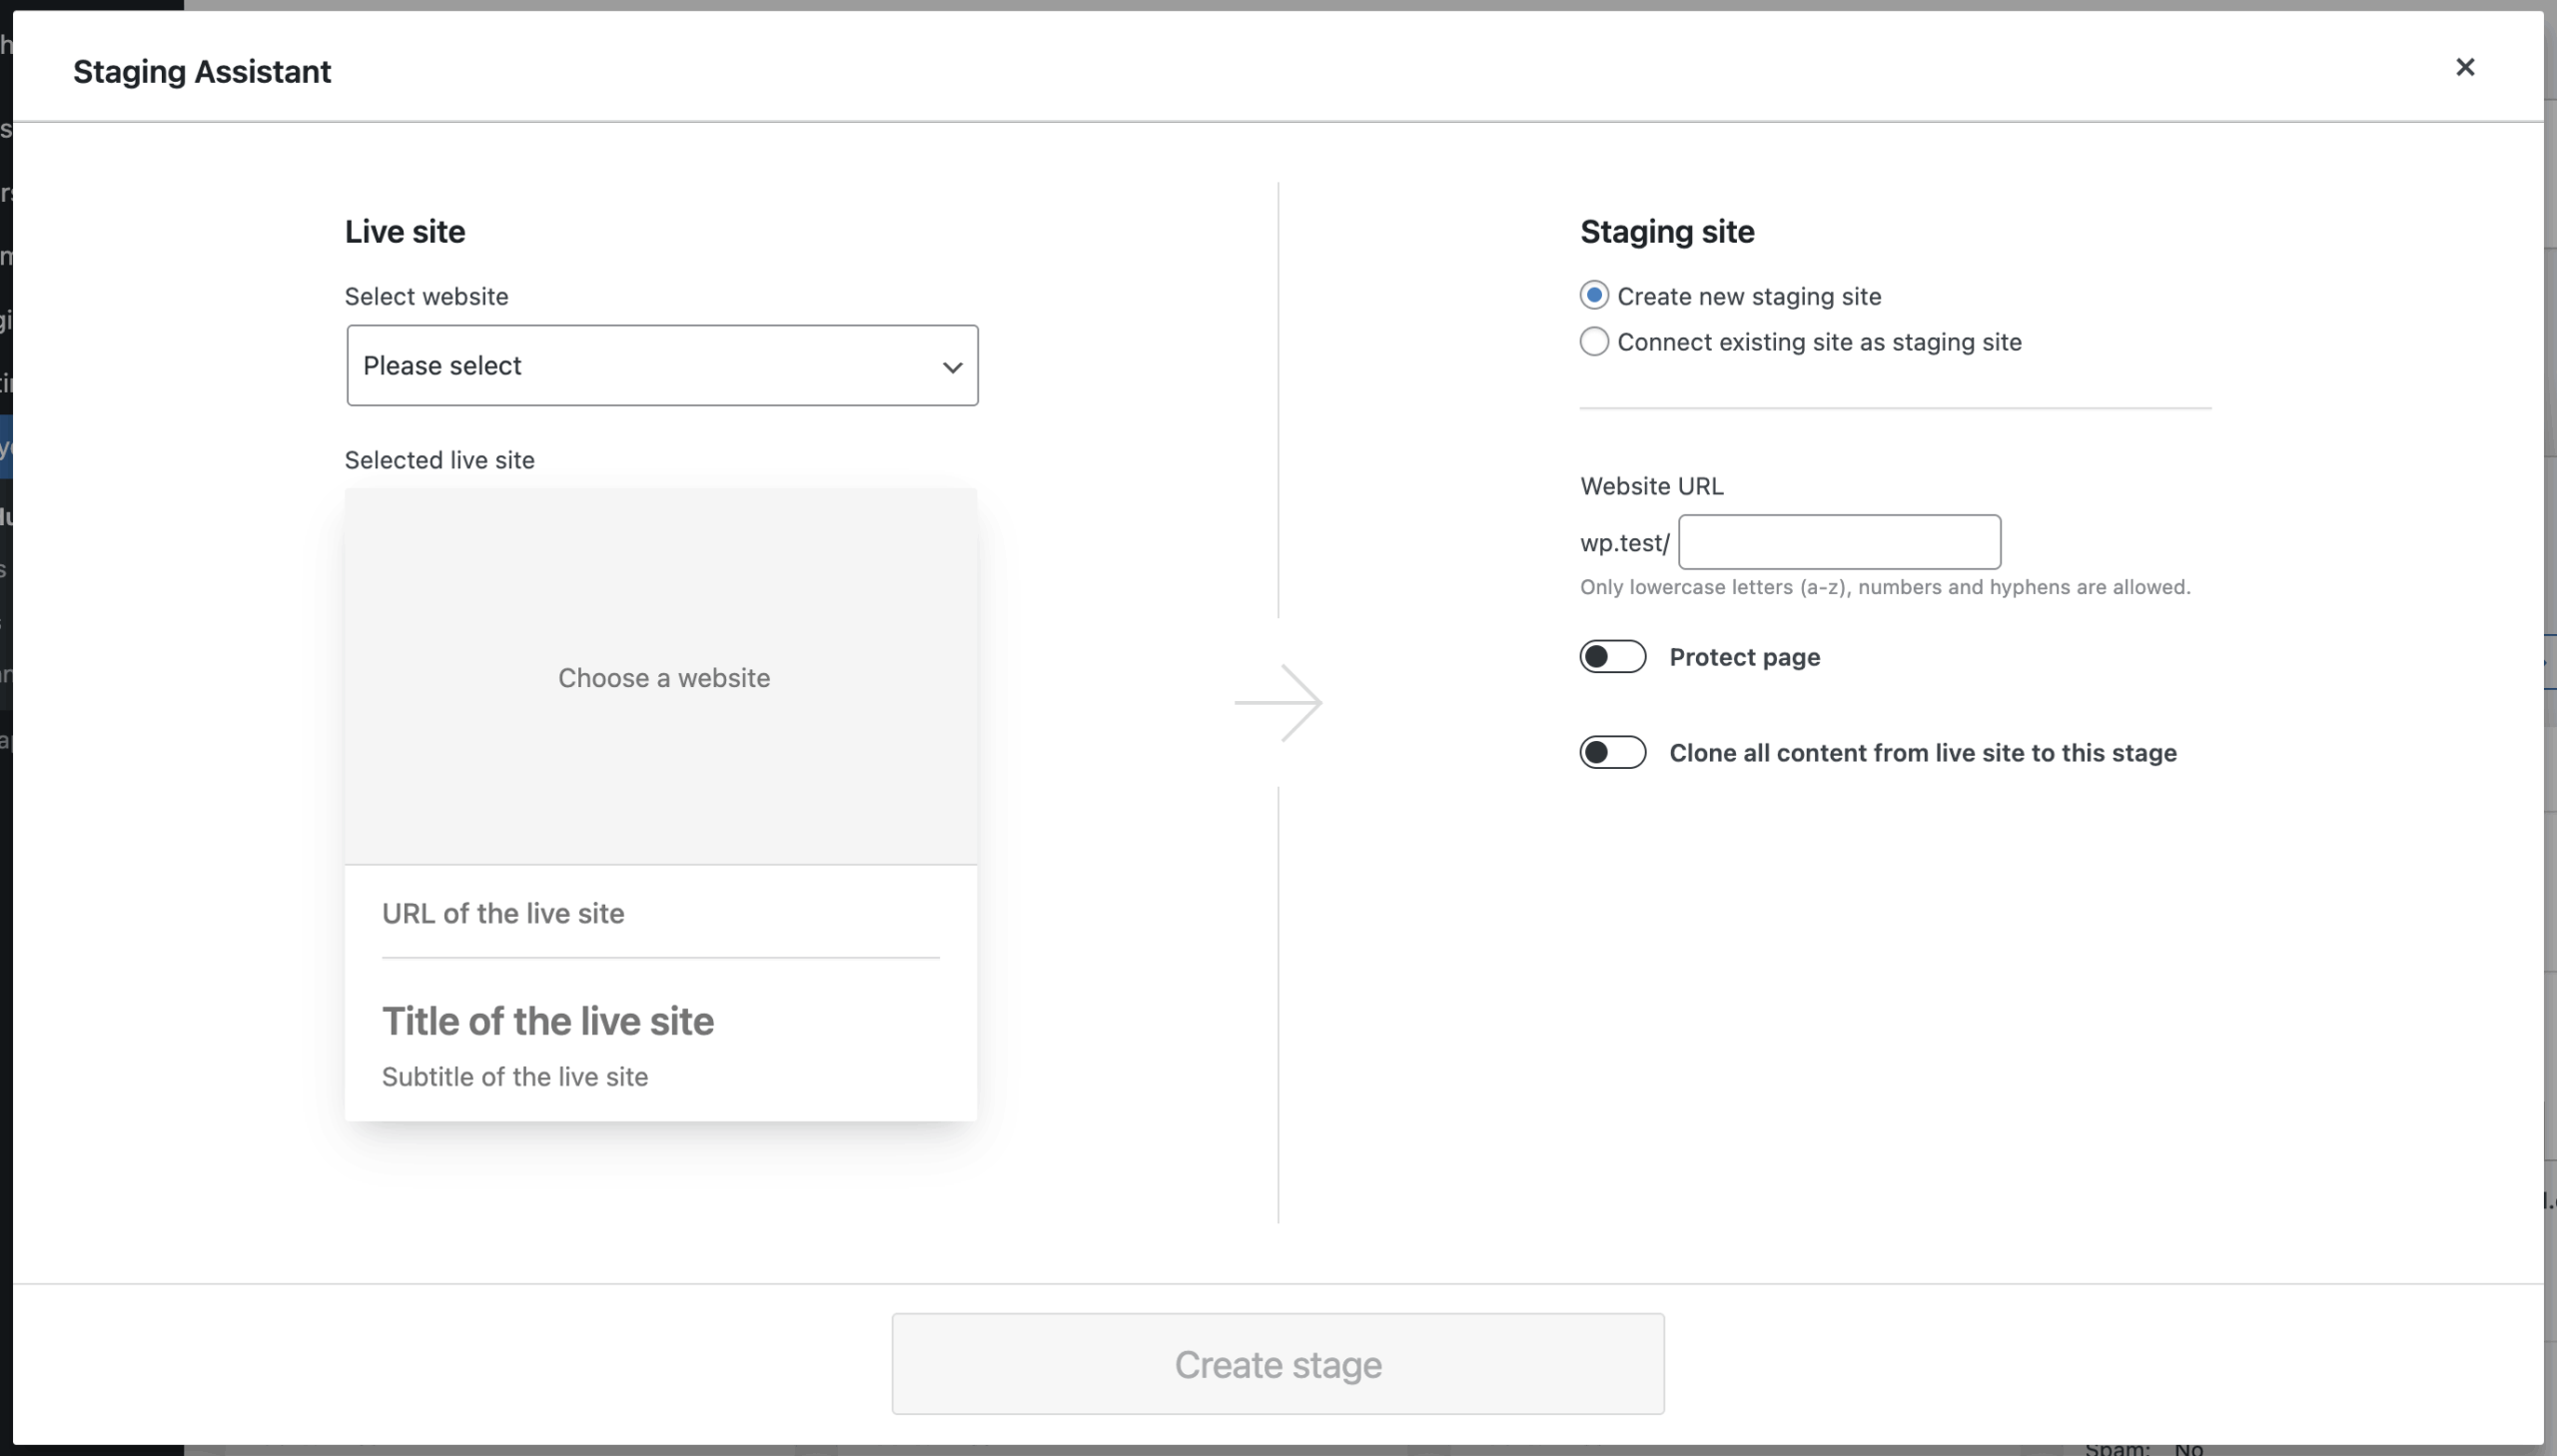
In the modal, you select:
- The Live website that you want to leave untouched.
- The Stating site that will serve as a copy of the live website.
Once confirmed, the staging site will be overwritten with a copy of the source. After that, both sites are linked as a staging pair and can be managed accordingly.
For full details on workflows and options, see the Staging documentation.
Migration Assistant
The Migration Assistant enables a quick and complete migration of one website to another within the same network. It opens via a dedicated button in the Websites tab of the Greyd Hub and launches a modal with all required options.

To perform a migration:
- Select the Source website you want to copy.
- Decide whether to Use a cleaned database, which removes unnecessary data such as revisions, entries, or plugin configs before migration.
- Select the Destination website that will receive the copied content.
- Optionally enable Make a backup of the content beforehand to automatically save the destination website before overwriting it.
- Click Start migration to begin the process.
All contents from the source — media, pages, posts, themes, plugins, settings — will be copied to the destination. The Source website remains completely untouched, while the Destination website is entirely overwritten.
⚠️ This action is irreversible. Always create a backup before migrating a site.
Website Tiles
The main content area of the Websites tab displays an overview of all websites in your installation. On a single-site setup, you’ll see just one entry. In a multisite setup, all registered websites in the network are listed.
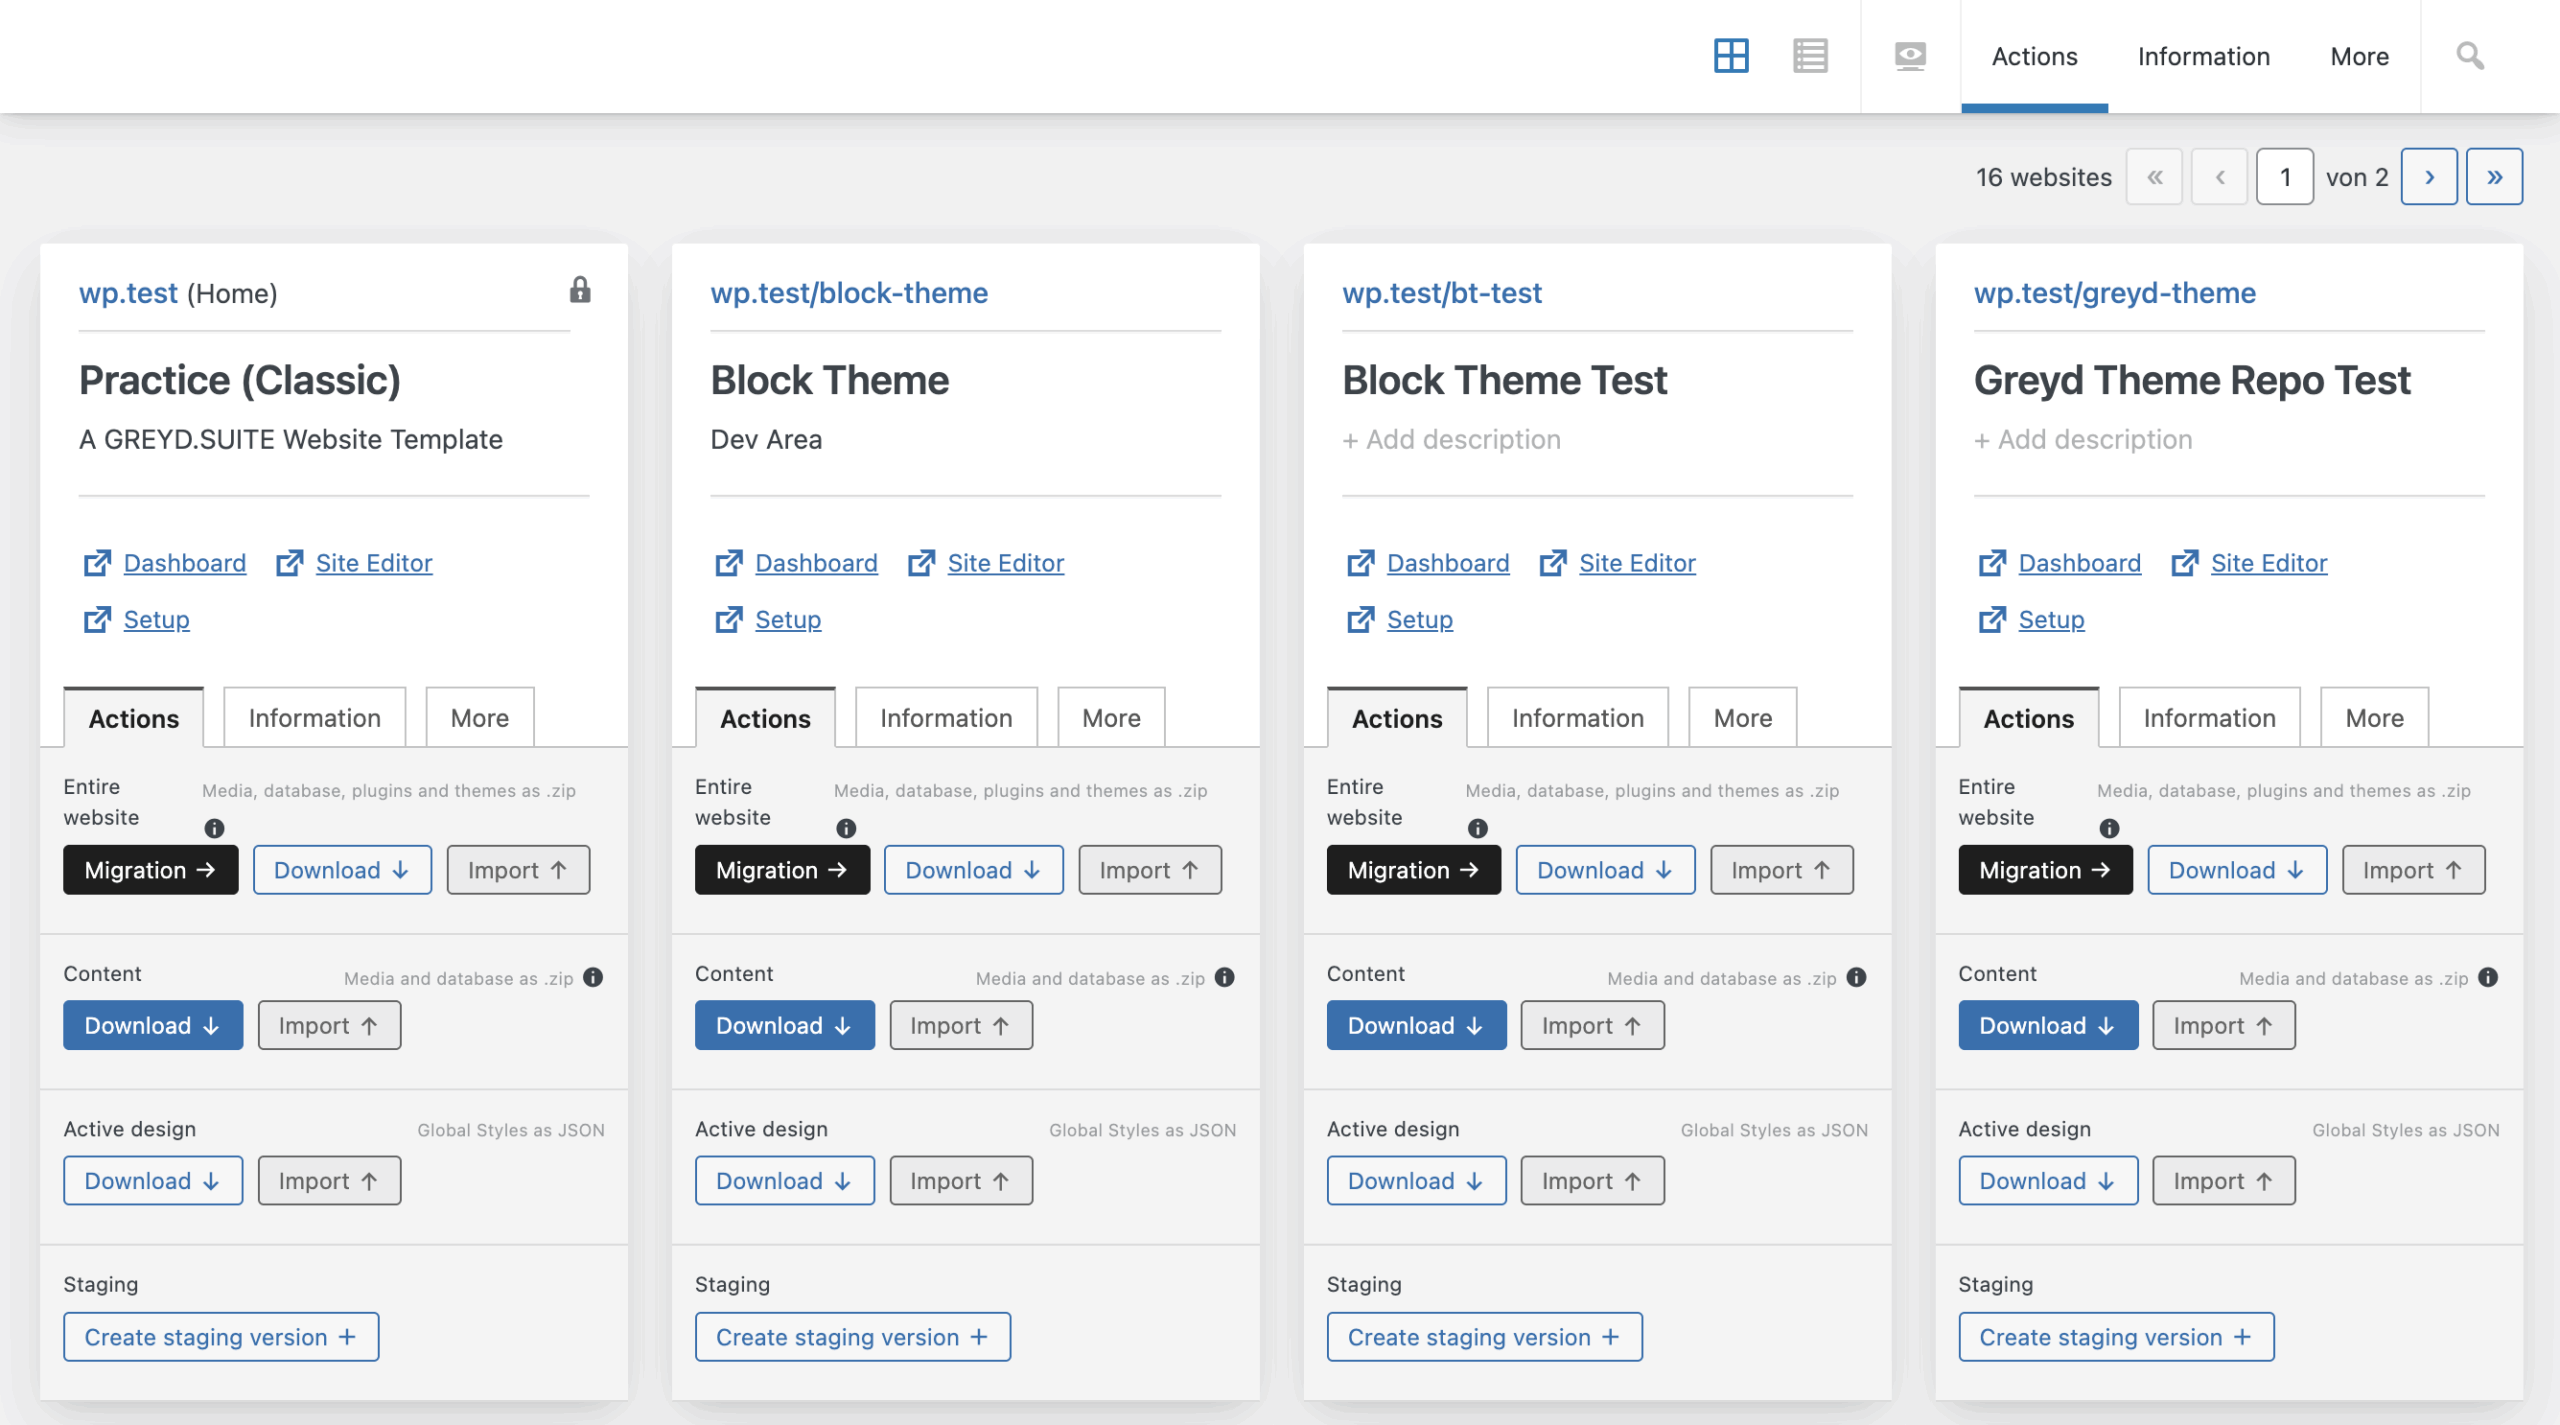
Websites are displayed either as tiles or in a list, depending on the selected layout in the hub navigation. Each website is represented with relevant data and tools to manage content, settings, and operations. Each website tile includes:
- Website preview (optional): If enabled via hub navigation, a scaled preview of the website is rendered directly in the tile using an iframe. ⚠️ In large networks, this can slow down performance as all previews are loaded simultaneously.
- Website URL: The domain or subdirectory of the site.
- Website title: The title of the website. This can be edited directly in the tile and saved inline.
- Website description: The optional tagline for the website. Also editable directly inside the tile.
- Quick links:
- Dashboard: Direct link to Greyd.Suite → Dashboard of this website.
- Site Editor / Customizer: Opens the block-based Site Editor if the Greyd Theme is active, or the Customizer if the classic Greyd.Suite Theme is used.
- Setup: Shortcut to the Edit Site screen in the WordPress Network Admin.
A note on the quick links: If you use redirects or plugins that hide the login area of your website, these links may not work as long as you are not logged in on the corresponding page.
Each website tile in the Websites tab includes three subtabs that organize all relevant tools and information for managing that site: Actions, Information, and More.
You can switch between them manually on each tile, or synchronize all tiles at once using the tab control buttons in the hub navigation. In list view, the tabs are hidden and can only be changed via the hub navigation.
Actions
This tab includes the most important tools to migrate content or download/import files (see screenshot above):
Entire website: Downloads the full site (media, database, plugins, themes) as a .zip file. No user or multisite settings are included.
- Migration – Opens the Migration Assistant with this site prefilled as source
- Download – Creates and downloads the .zip file (also saved in Backups)
- Import – Upload a previously exported .zip and install it to this site, overwriting the current site
Content: Exports media and database (posts, pages, files). No plugins, users, or multisite data. Buttons: Download and Import
Active design: Exports Global Styles (Greyd Theme) or Customizer settings (classic theme). Buttons: Download and Import
Staging: Create a staging version using the Staging Assistant (source is prefilled).
Information

This tab shows technical details and editable site settings:
- Blog ID – Internal site ID
- Admin – Admin email address
- Registered – Date of site creation
- Updated – Last updated timestamp
Editable attributes (Yes/No toggle):
- Public – Search engine visibility
- Archived / Spam / Deleted – Marks the site as inactive with a frontend notice
- Adult content – Sets the “mature” flag (for custom implementations)
- Protected – Controls frontend access:
- No: public
- Users only: only logged-in users
- Admins only: Super Admin or Administrator
- Password: site access via password (can only be changed, not recovered)
Additional info includes the active theme and a list of active plugins (including network plugins on multisite). Missing plugins are marked as “not found”.
More
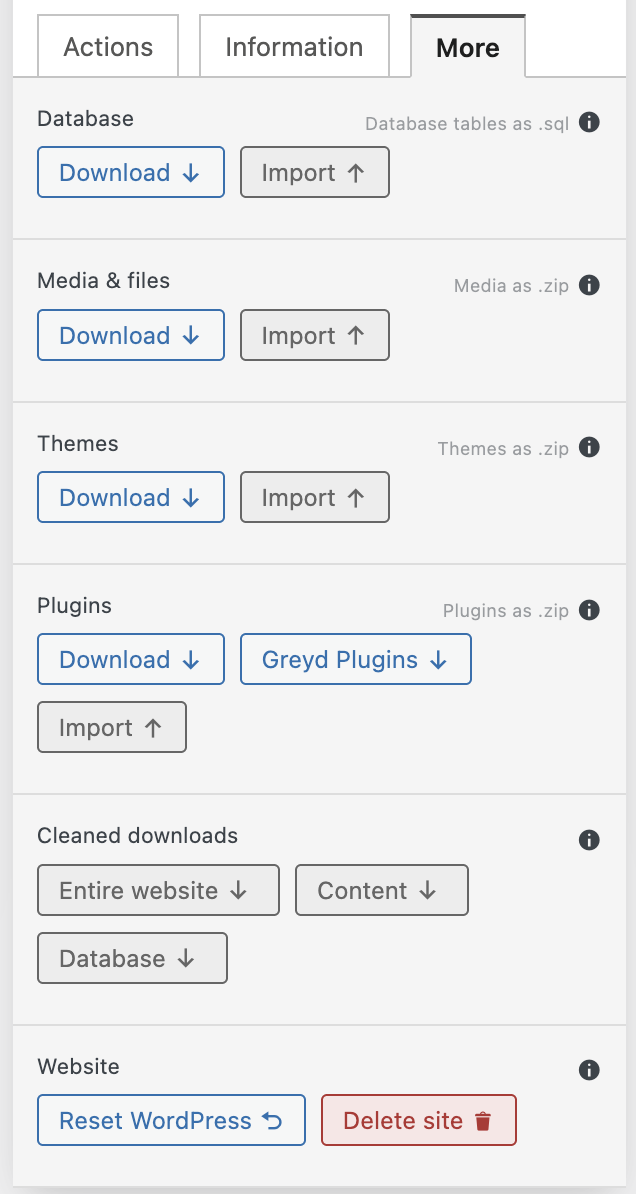
This tab contains extended tools for granular imports, downloads, and resets:
- Database – Export/import all DB tables (.sql)
- Media & files – All WordPress uploads and fonts as .zip
- Themes – Active + parent theme as .zip
- Plugins – All active and network-wide plugins as .zip
Includes extra button for internal plugins like Greyd Plugin, Greyd Forms - Cleaned downloads – Smaller .zips without logs, revisions, unused media, etc.
Includes: Entire website, Content, Database - Website – Only available if site ID ≠ 1
Reset WordPress: deletes all content, resets theme/plugins
Delete site: permanently removes the site
Warning: Reset and delete actions are irreversible. Always create a backup beforehand.
Backups Tab
In the Backups tab, you have an overview of the manually generated backups. See the separate Backups documentation for more details.
Database Tab
In the Database tab, you can work with the database tables from the WordPress backend. See the separate Database documentation for more details.